Monday, July 12, 2010

the architect in me

I've been trying to brainstorm a new way to package my booties and make them easier for gift giving. As is usually the case when I'm trying to figure these kinds of things out, I revert to my training in Architecture for rendering my ideas. In my head, I could fold some acetate in such a way as to create lovely little bags for my booties, like this:


new packaging,
originally uploaded by out_of_the_box.

To see if what I was visualizing in my head could actually work I used some good, old-fashioned, architecture-school model building to work out the details. (yes, this is what I do for fun) After a few stabs at a prototype, I had it all figured out:


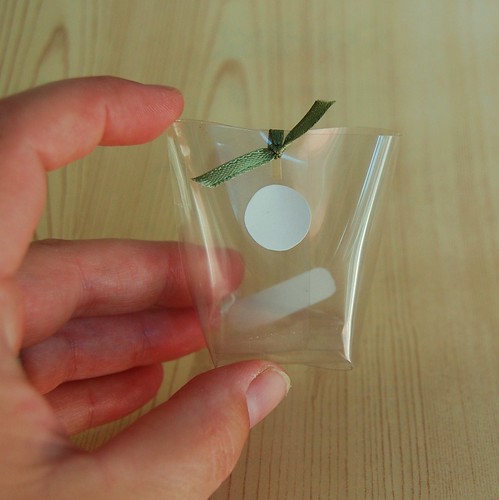
So when there I times that I start to get down on myself because I'm not out there using my degree for building things architectural, I must remind myself that everything has it's place in the snowball effect process that got me where I am today. No, I'm not carefully constructing scaled models of buildings, but I did figure out a pretty nifty way to bag my booties!

P.S. New booties in the shop!


Tuesday, July 06, 2010

strange summer weather


4th of July Barbecue,
originally uploaded by out_of_the_box.

Oh my... how quickly the weather can change from being perfectly lovely barbecue weather to a damp morning of rain. July, you're a mystery to me! But waking up to all this moisture on a Summer day makes the house feel like it must be in Kauai, Hawaii. I LOVE morning showers in Kauai. There's a wonderful scent in the air - a combination of rain drops on green leaves, wet earth, damp grass and blooming flowers. Yes, I keep wishing for the sun to come out (especially since we've really only had one clear, blue sunny day so far this Summer), but I'm not going to complain about this morning's shower. Saves me some time now that I've started hand-watering everything to conserve water. So, thank you, July! You've given me at least an hour for some other kind of fun. There's that pile of wonderful fabric waiting to be transformed into matching quilts for the boys. I'll sit here next to the open window and cut fabric. Can't ask for a better morning than this!

Monday, July 05, 2010

summer project 1: sand dough

Summer Projects
no. 1

Sand Dough,
originally uploaded by out_of_the_box.

We're a few weeks into Summer Break now and I'm happy to report that I've been successful at keeping little boys busy. The best thing for all of us to do is arts and crafts. It's something we can all enjoy together. One of our latest projects was making Sand Dough. In concept, it's a lot like making regular, homemade play dough, just add sand. The boys got a kick out of it and especially liked the idea that they could build sandcastles that wouldn't get stomped on or washed away by a rogue wave. I suggest giving kids a small piece of wood or a cutting board for assembling their creations. This way you can easily move it to dry once they're finished.

The recipe is VERY simple. But since it involves some cooking on the stovetop, the task of making the dough should be for grown-ups only. (while you're making the sand dough, have kids sort rocks and/or seashells for using to decorate their creations) Combine one cup of sand, one cup of cornstarch and one cup of water in a saucepan over medium heat. It will be watery, but don't worry, it should start to thicken up as the mixture warms. Once it starts to come together into a ball of dough, transfer to a clean bowl to cool before little hands start working their magic.

From here you just let little imaginations run wild. Finn enjoyed simply mooshing his ball of dough around on his board. Robbie proceeded to build a fortress for his "seashell". I made "starfish". This batch of dough was made from a scoop of sand I grabbed from the boys' sandbox. I suspect that real beach sand would be even better. The sandbox sand is a little too white and artificial looking. As I was molding my "starfish" I found myself wishing the dough had some specks of black like at the beach. Once the creations are complete, put them out in the sun to dry. If pieces fall off (as they did with Robbie's castle), use some white glue to reconstruct the masterpiece once it is dry.

I couldn't stop thinking about how dough made with crushed coral sand from Hawaii would look. There are so many possibilities! I'll probably turn my small creations into magnets for the fridge. Next time I make a batch, I think I'll mold some into small blocks of all shapes and sizes. Once they dry they would make excellent sand castle blocks! (that might be more fun for Finn who, at 3-years old, is more excited by stacking than molding) Regardless, the kids were very intrigued by the whole proecess. You can definitely expect to fill an afternoon with this project. Have fun!

Sunday, July 04, 2010

nothing says summer like corn!

Happy 4th of July !


Ready to barbecue
originally uploaded by out_of_the_box.

I'm sure everyone is off at the beach or the lake, having a picnic or getting settled in for a fireworks display. Here at the Huntington house, I'm getting ready for a little Independence Day barbecue. I've got my corn all prepped- pulled the husks down and removed all the silks before tying it back up with some hemp twine. These will soak in some water for 10 minutes before I brush them inside with a chili-rub. Then they'll sit on grill while our turkey and hamburger sliders cook. Sound good? Give it a try! Here's the recipe for the chili-rub:

(for 4 ears of corn)
1 teaspoon melted butter
1 Tablespoon olive oil
1 Tablespoon chili powder
1/4 teaspoon salt

Combine all ingredients and brush on the corn kernels after allowing the cobs to soak in some water. Pull the husks back up and tie to secure. Place corn on the grill and cook until tender, 15-17 minutes. (if they seem to be cooking too slow, I often make a big pouch out of aluminum foil to wrap up all the ears of corn together - since the husks still have some moisture in them, this creates something like a steaming tent and tends to speed the process along)